Description: During the Summer of 2020, I launched controlmylights.net, an interactive light exhibit powered by a complex construction of NodeJS streaming data, Python, Redis, MongoDB, openFrameworks, ReactJS and Arduino controlling DIY LED tube lights. Chat data was gathered via Twitch’s API, and a Selenium scraping program for YouTube’s chat. It used Redis for an internal queue and pub/sub, as well as a MongoDB (NoSQL) database to store color commands. The program was architected using a Message Oriented Middleware paradigm with Node.JS as the main language. I created a website with buttons for every color that the light application supported using ReactJS and originally designed it in Figma. That project raised funds for Feeding America with several active users and over 2,000 Twitch views.
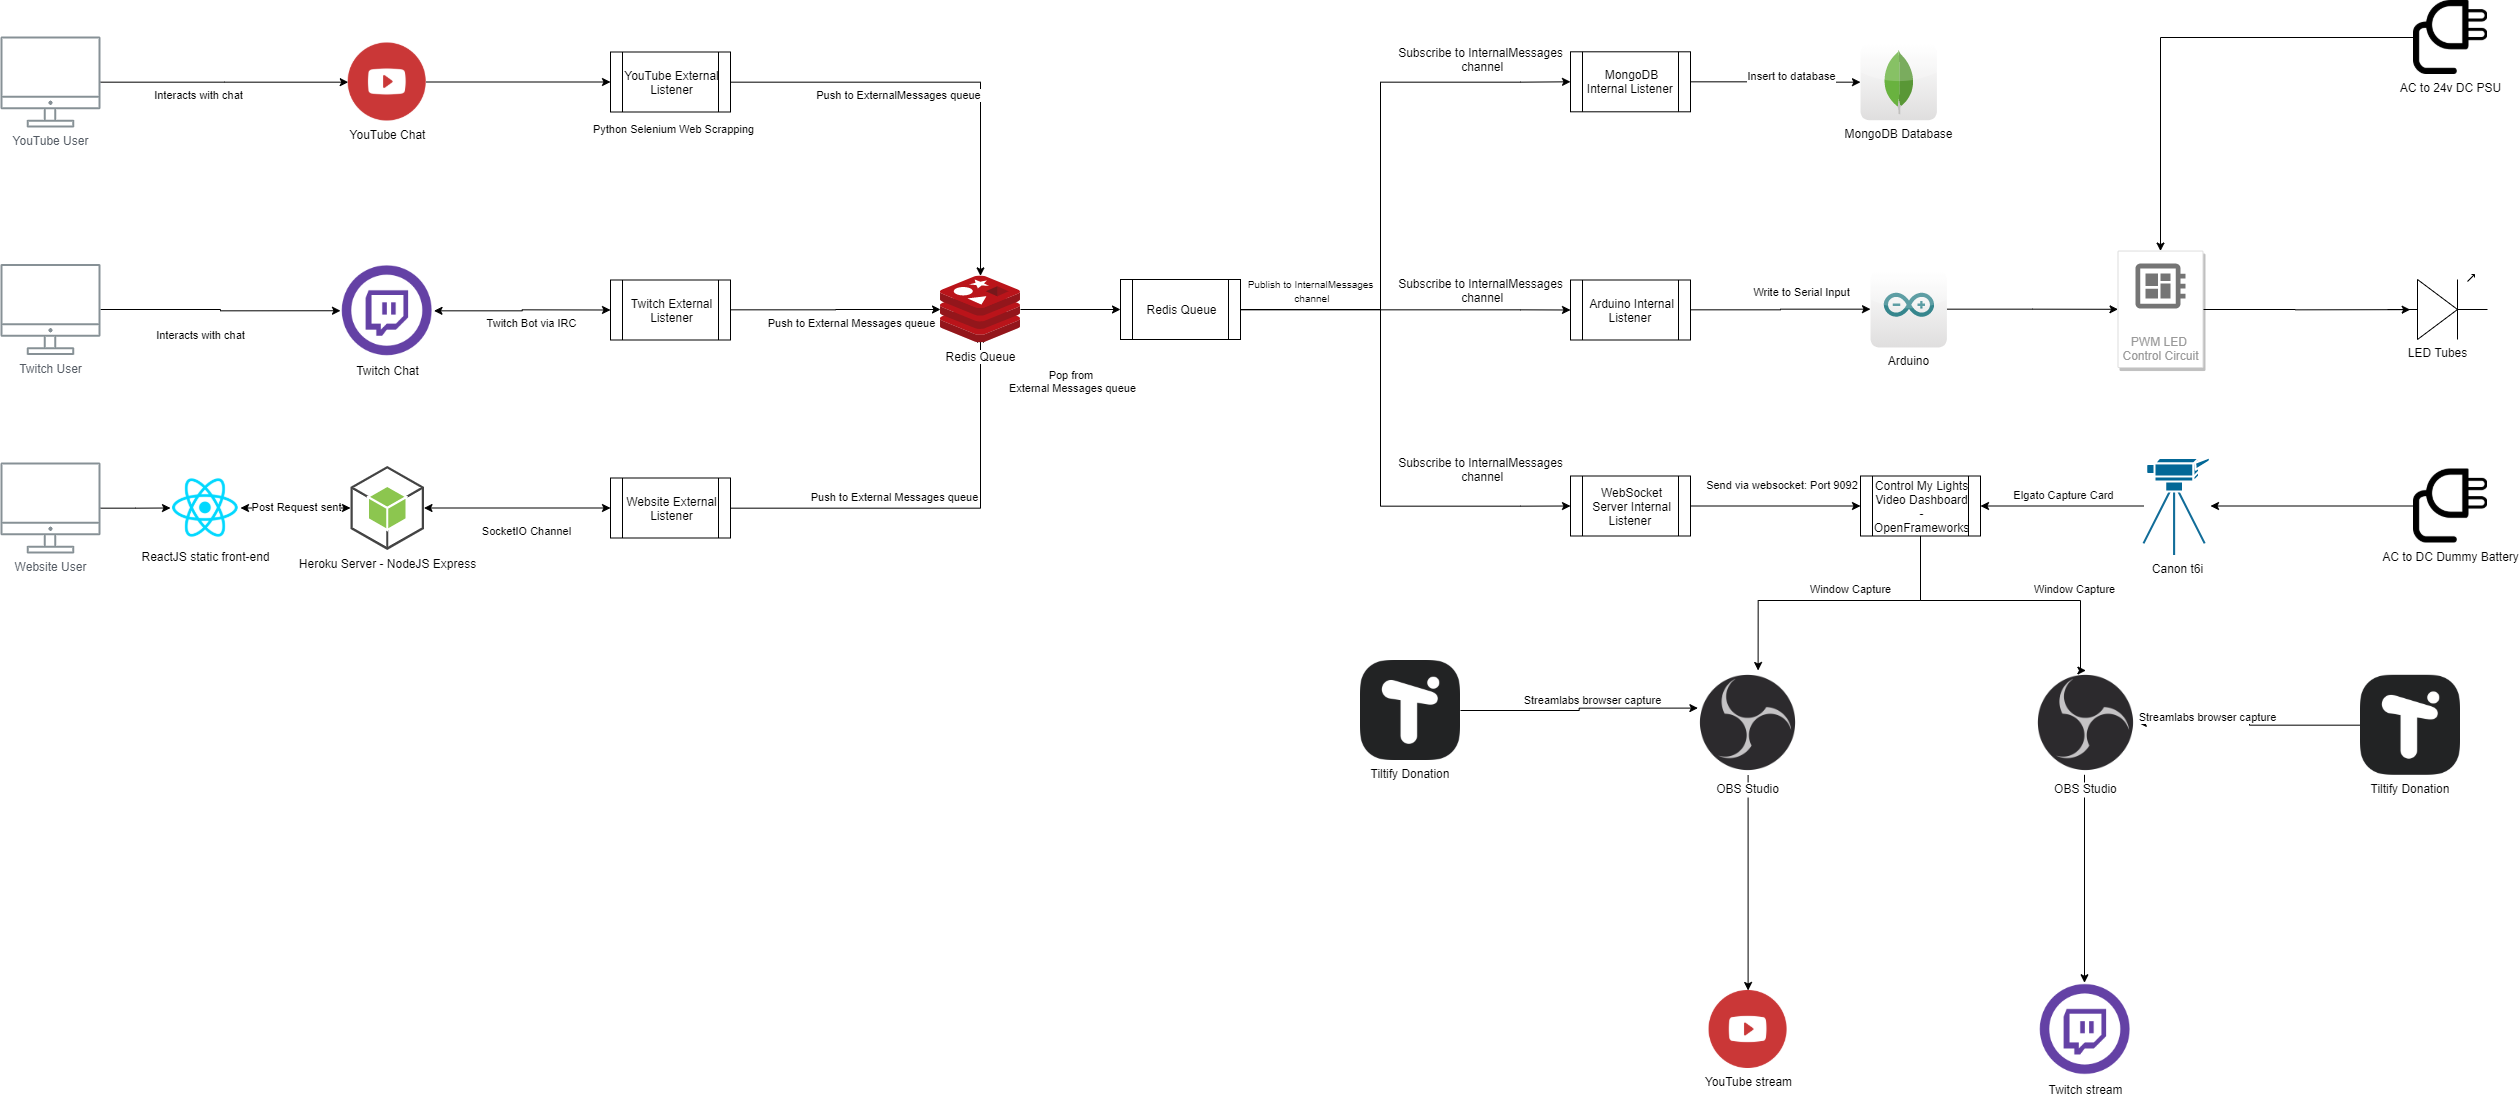
This is a high level view of the final architecture:

Date — May 2020 – September 2020
Repository link — https://github.com/EdwardDeaver/ControlMyLights
Website — controlmylights.net
Programming languages used:
1
2
3
4
5
6
7
8
9
* Webite:
	* ReactJS
	* NodeJS
* Desktop:
	* NodeJS
	* Python with Selenium
	* OpenFrameworks 11 (C++ Creative Coding Framework)
* Hardware:
	* Arduino(C++)
Programming languages explanation – ReactJS was used to make the controlmylights front-end. NodeJS runs a majority of the program. The website backend runs on NodeJS as well as a majority of the desktop app. Python is used to control Selenium to get YouTube comments. OpenFrameworks was used get external video input, and display an animation when a new color command was sent. Arduino was used to control the light tubes.
Databases used — MongoDB, Redis
Databases explanation — Redis was used to implement a queue system and Redis Pub/Sub. MongoDB is used to store color commands that are sent to the lights.
Hardware used — Arduino Uno, Elgato Camlink
Hardware Explanation — Arduino was used to control the lights over serial. Camlink was used to capture Canon T6i video.
Other applications used: Figma – used to create a website mockup. Canva – used to make the stream offline image on Twitch.
Continue reading for a full breakdown of how it was made
Inspiration:
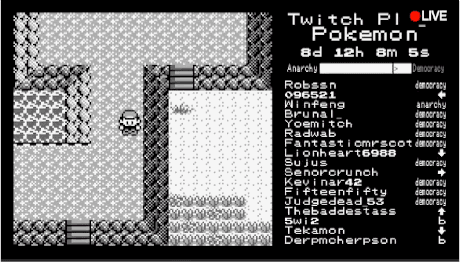
This project was inspired by the 2014 Twitch Plays Pokemon project. Twitch chat controlled Ash in his quest to “Catch Them All”. Also, I was gifted 2 4-foot lengths of Flexfire RGB LEDs and had been looking for a project in which to showcase them.
Initial Experiments:
The project began very simply as a single file in NodeJS, using the TMI.JS library to retrieve Twitch chats. Using Twitch’s is fairly simple with the help of TMI. It’s a websocket based API, so I didn’t have to worry about polling. Early on in this process I knew I wanted to build in analytics, so I could do some deep dive videos on it after the fact. For this I went with MongoDB, because my schema was still changing daily and I didn’t want to deal with the schema issues of SQL tables.
Initial Architecture:
By May, I had settled on a stack for the part of the program that ran on my desktop (it changed after this). The stack was NodeJS, Express, SocketIO, and MongoDB. Normally these stacks make up an interesting name, mine did not.
Creating a Message Oriented Middleware paradigm:
By May I knew I wanted to break up the project into components or loosely coupled classes that would allow as many data inputs as I wanted and as many outputs. To do this I initially used ExpressJS and SocketIO to build a router to push data around my system. I now know Express is one of the slowest web servers for NodeJS and is not made for this. I had it setup to accept a Post request to the “sendcolordata” endpoint running on my machine. The internal components, like the eventual MongoDB component and Arduino component, would connect to the SocketIO server running on the “internalcolordata” room. Going with this architecture, Message Oriented Middleware, allowed me to build individual components like a website to control it, and easily test each component. Another benefit to this architecture was it allowed the files to act as microservices, so if the Twitch component failed or the Mongo component failed, the whole program would stay up. This also allowed me to implement a queue system, initially using Bull, later Redis for color commands.
Initial architecture vs new and improved architecture:


Eventually this was the final architecture (made with Draw.io):
Building the Twitch Bot:
A Twitch Bot is a program that hangs out in your Twitch chat waiting for a command whether that be deleting spam comments or responding to someone asking how long you’ve been streaming. In my case, it was going to listen for color commands.
Building the color commands:
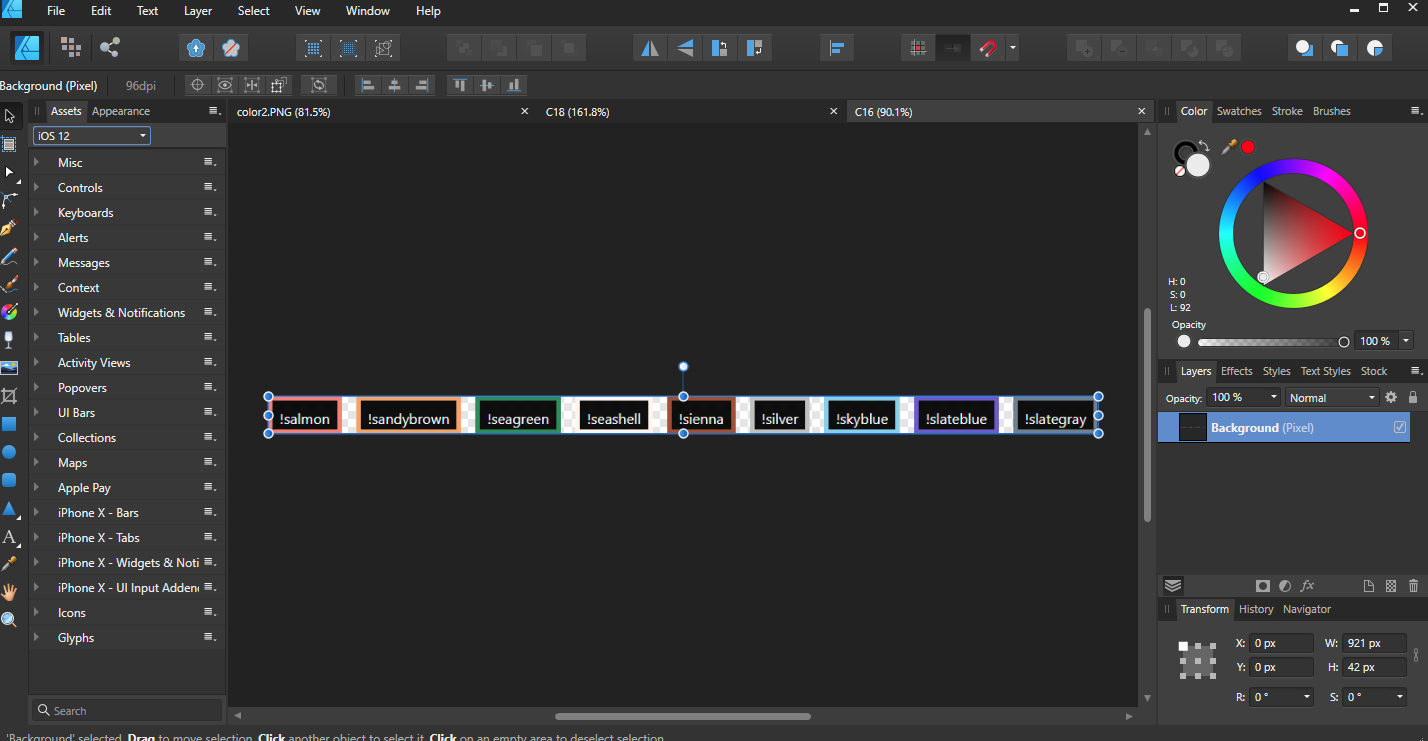
I wanted people to be able to easily change the colors of the lights. After trying to find a Pantone color list with hex values, I moved onto a well known list of colors: HTML Web Safe colors (I modified this list). Using this list allowed me to have a nice hex color code reference for all of the named colors. Example:
Chartreuse is #7fff00
. In order to easily decipher between normal chat and a color command I went with a text format I’ve seen used of adding an “!” before the command. I also wanted to give the user a choice of a custom color, so I also added “#” to signify a custom hex color. This basis around hex would become the core of the application.
Messages:
Building the Twitch bot was straight forward using the TMI library. I checked if the message started with a “!” or “#”, then checked if the “!” command was in my list of colors, if not the program moves on. If the command starts with a “#” the program checks it is a valid hex. Once this was working, I built out a class to send data internally, and used it to send data to the Express Server. At this point, I decided to establish a data schema that would persist throughout the application and hashing using MD5 usernames, so I could determine the number of unique users while not storing their names.
Schema: source, msgUsername, validColor, hex, “#HEXVALUE”. Eventually this would be updated to:
1
2
3
4
5
6
7
{ source: source, username: MD5(“username”),
validColor: True/False, hex: True/False,
color:  ‘#000000”,
red: RedValue,
green:  GreenValue,
blue:  BlueValue,
dateTime: new Date()   };
Architecture Status:
At this point, the local Express server is sending the color messages it received to a MongoDb database directly.
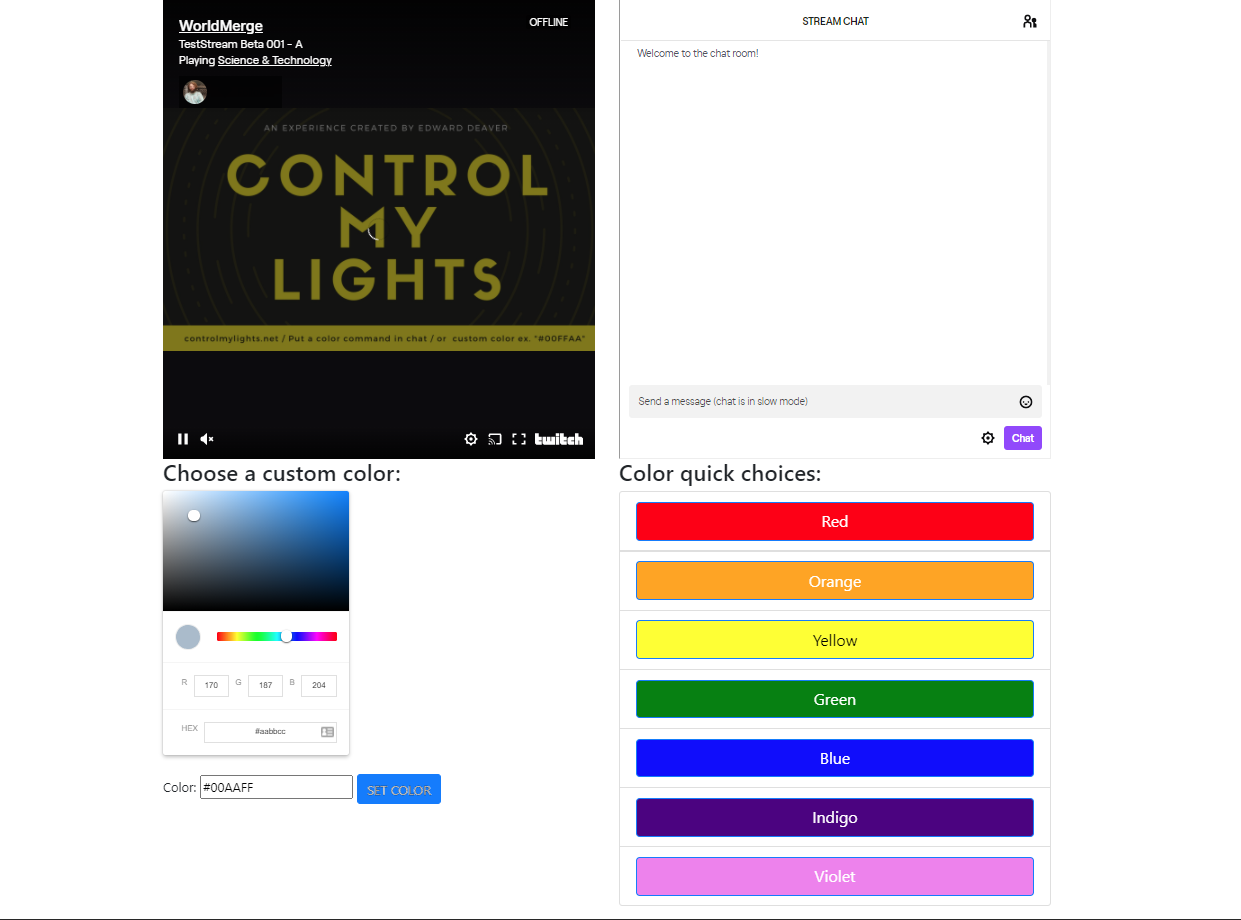
Building the website:
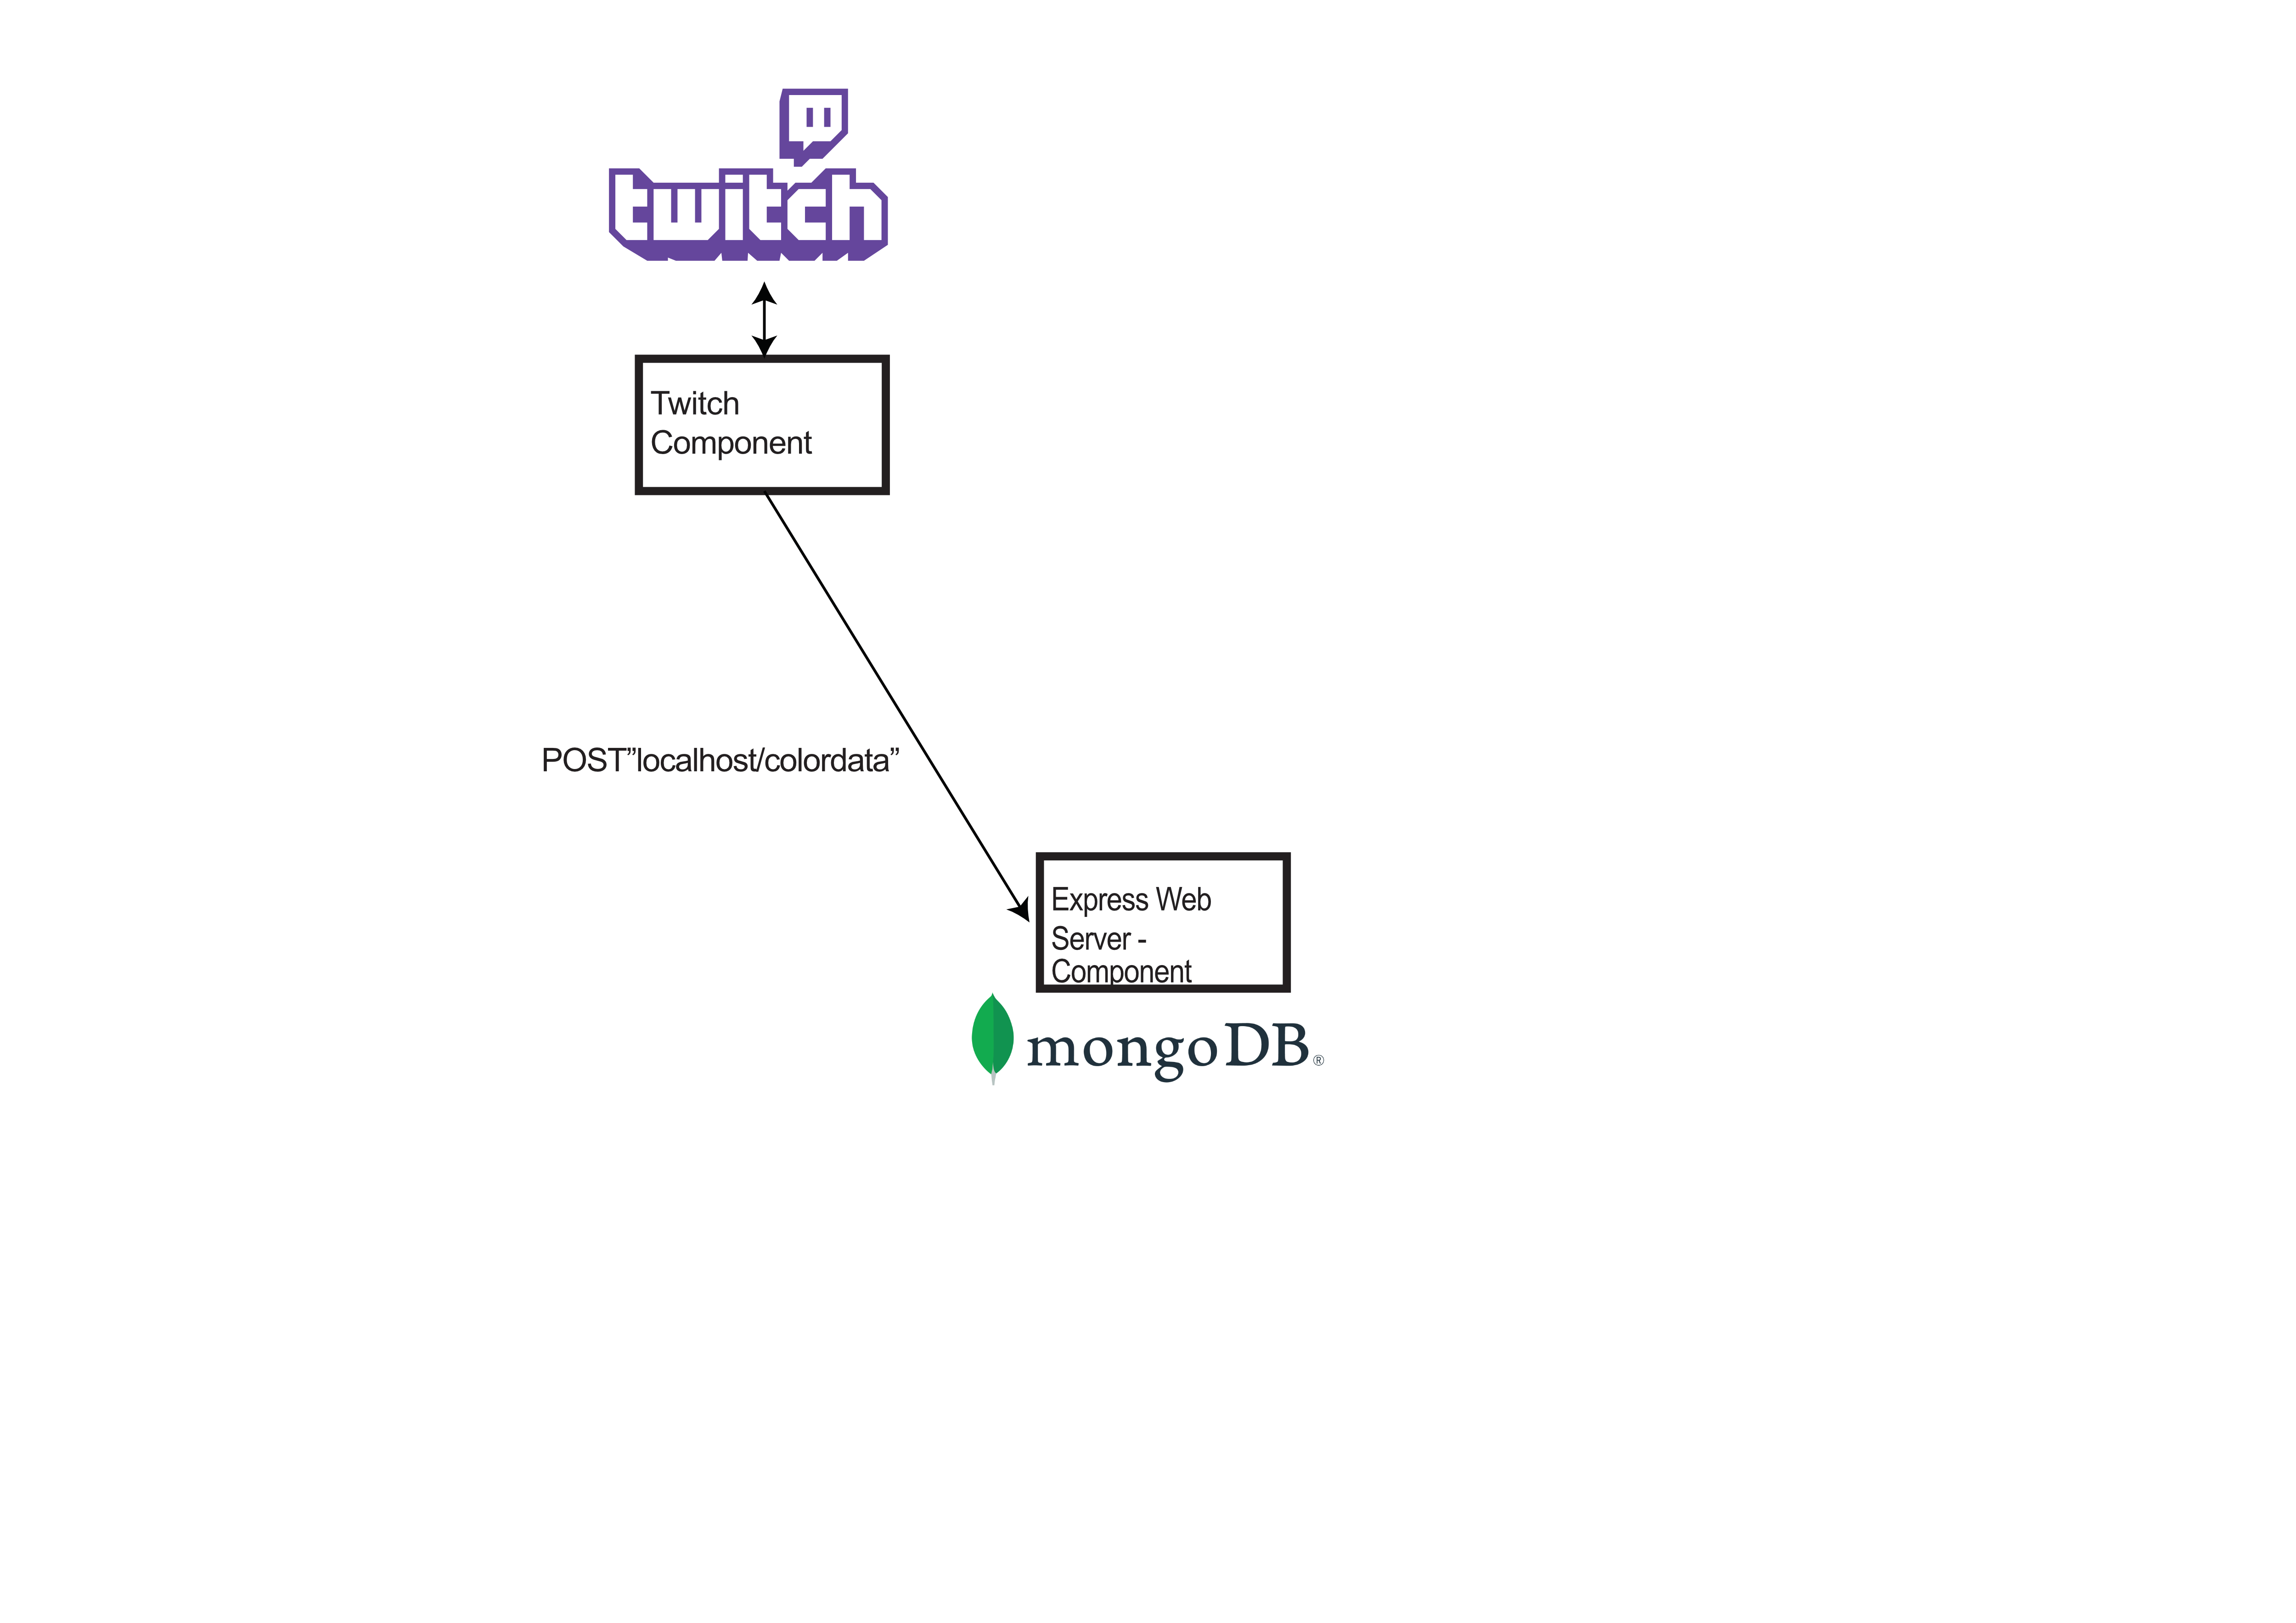
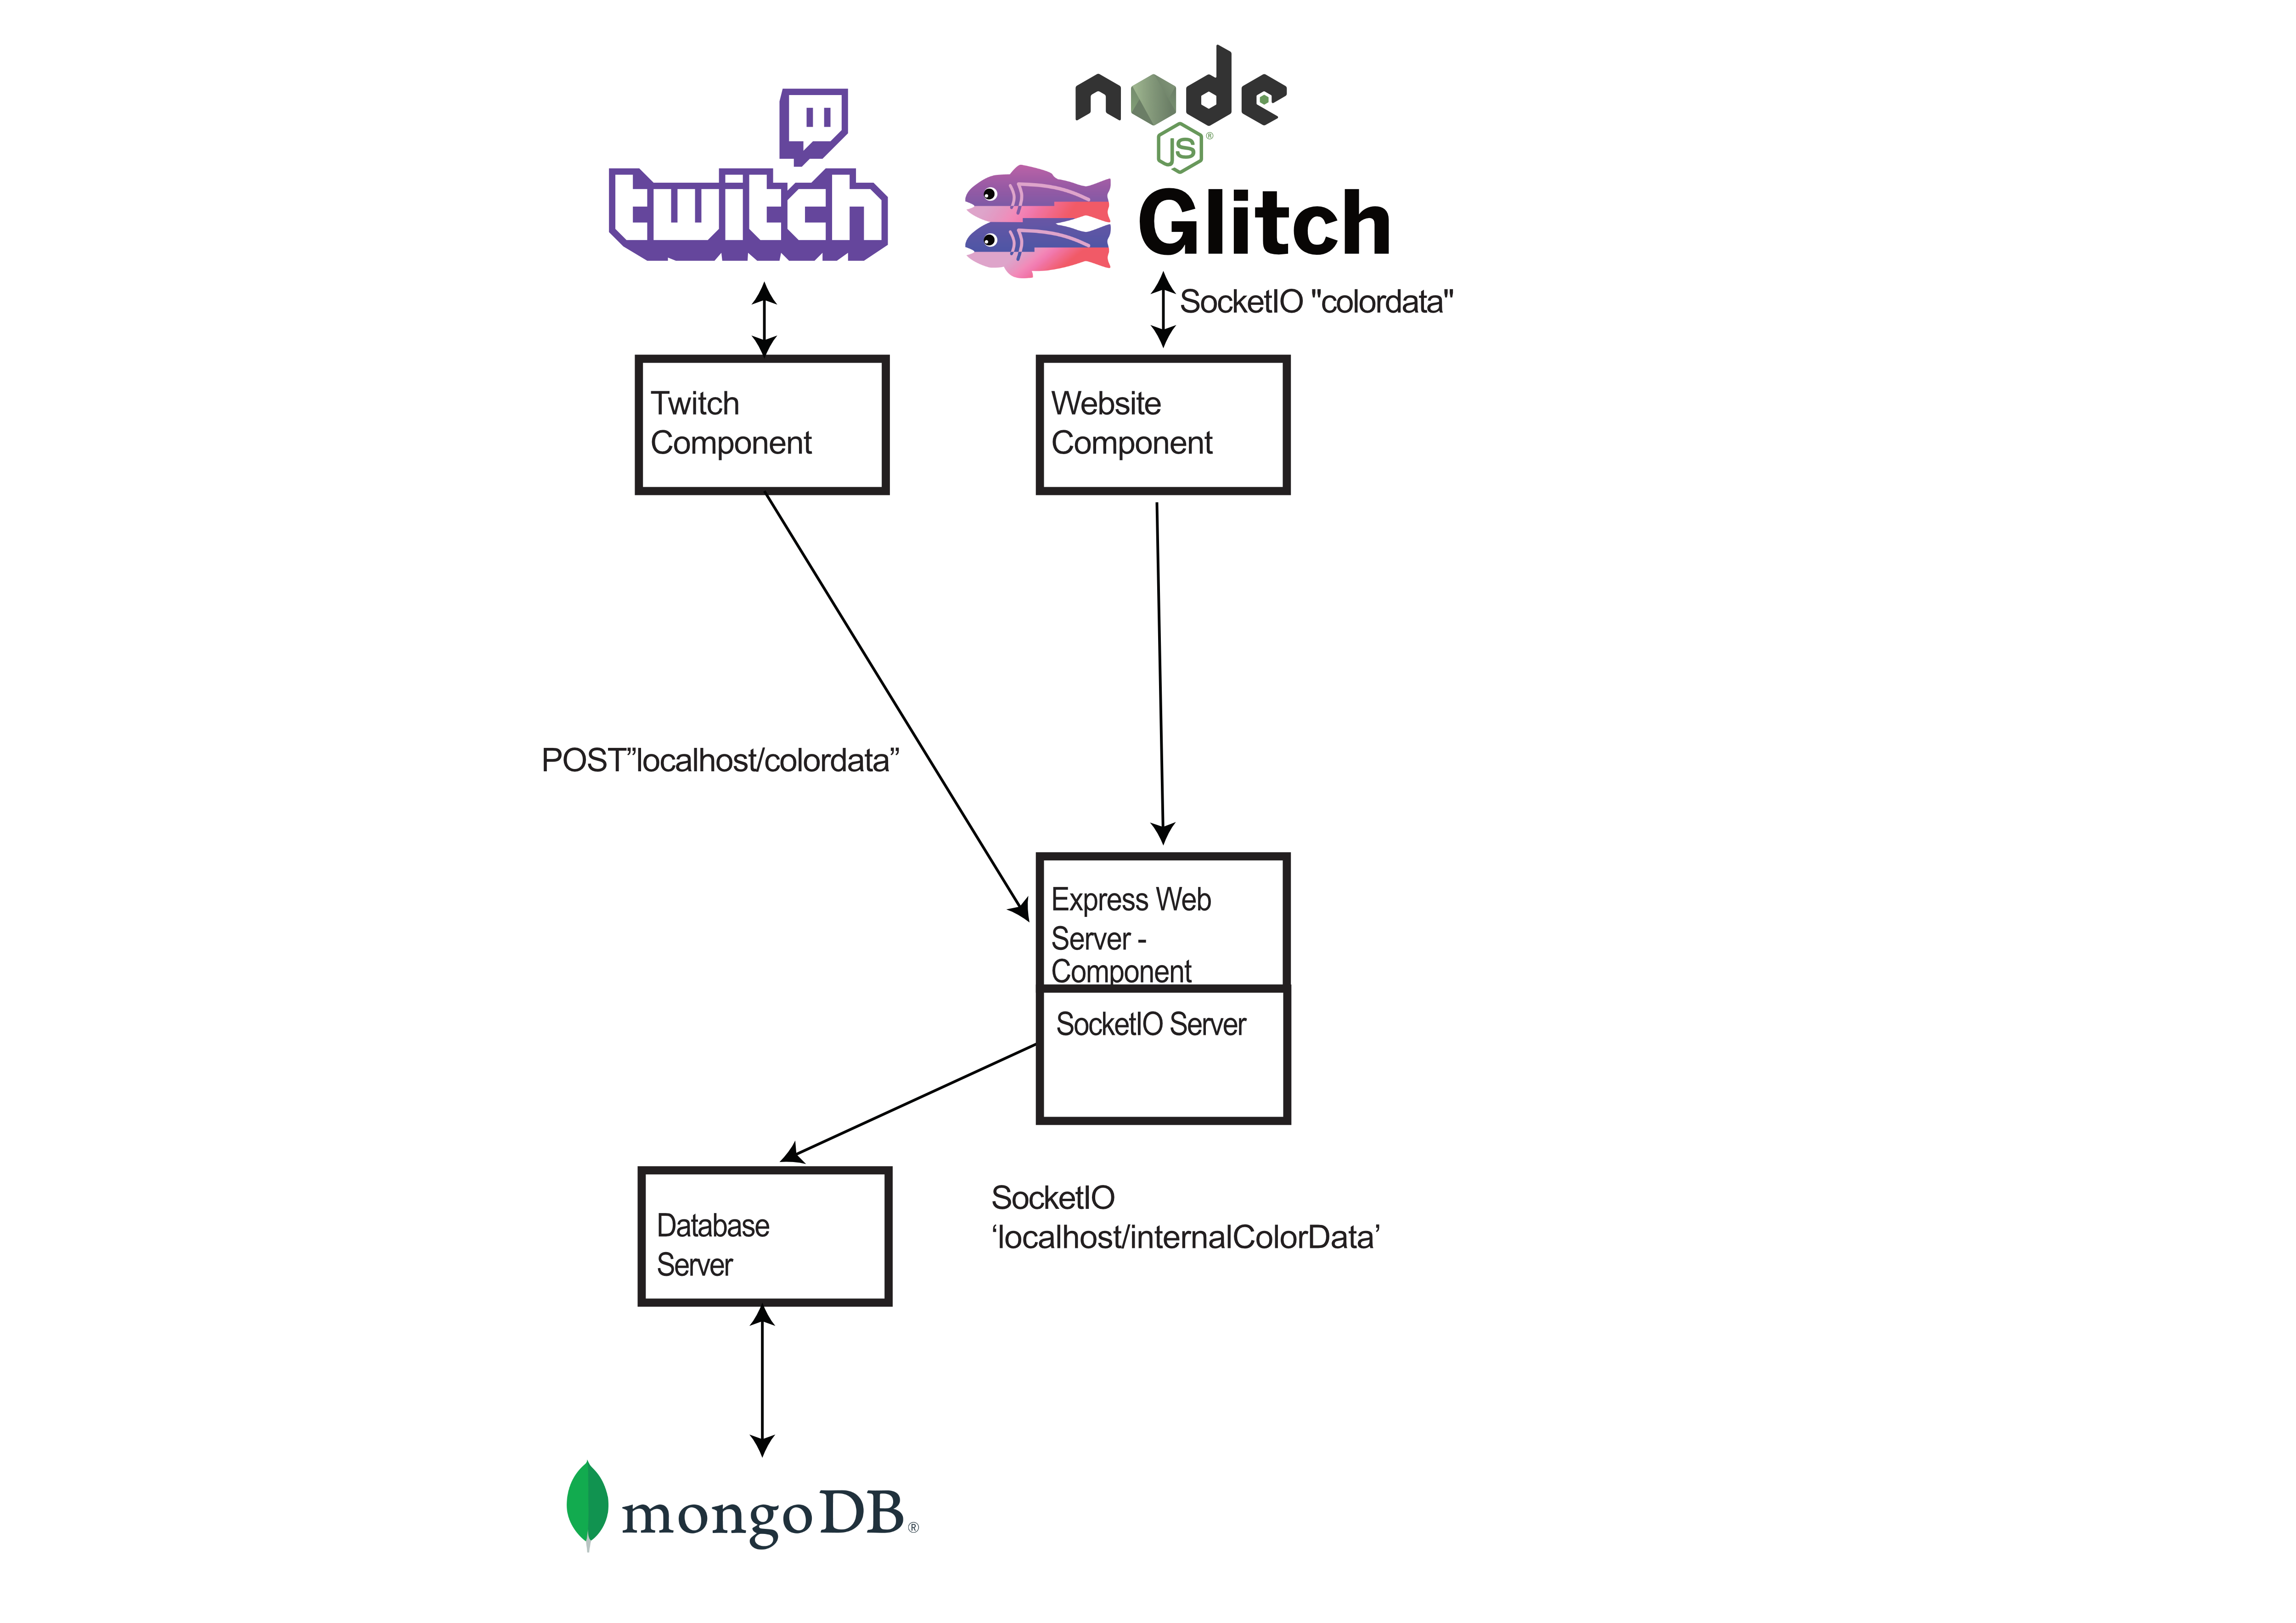
Initial website development In addition to Twitch I wanted to have a website to allow users who don’t have a Twitch account to be able to interact with the project. To get started with this, I started making the project on Glitch.com, a site that lets you easily host your NodeJS site and edit it in the browser. I started with a proof of concept site: The quick color choices were manually-created form buttons, and the color picker was made using “a-color-picker”. Once I got the buttons and color picker sending data to the backend server via a POST request to the “colorsubmit” endpoint, I implemented some security measures: CORs, origin checks and input validation. The website blocks POST requests made to it from outside sources. After receiving the data successfully I needed to send it to my computer. I did this using the library SocketIO, a websocket implementation, to make dealing with websockets easier. To secure the socket I passed it a key from my desktop client and checked for a match. At this point the project architecture looks like this:
old site for Control My Lights
Making a better website:
After learning how to implement SocketIO on Express for the web server, I implemented it into my localhost program. I pushed the data to a local SocketIO room, and created a MongoDB listener for it that inserted the data being sent to a database. After working on the internals of the program more, I moved back to working on the website with the goal of redesigning it and learning ReactJS along the way. I created a mockup of the site in Figma:
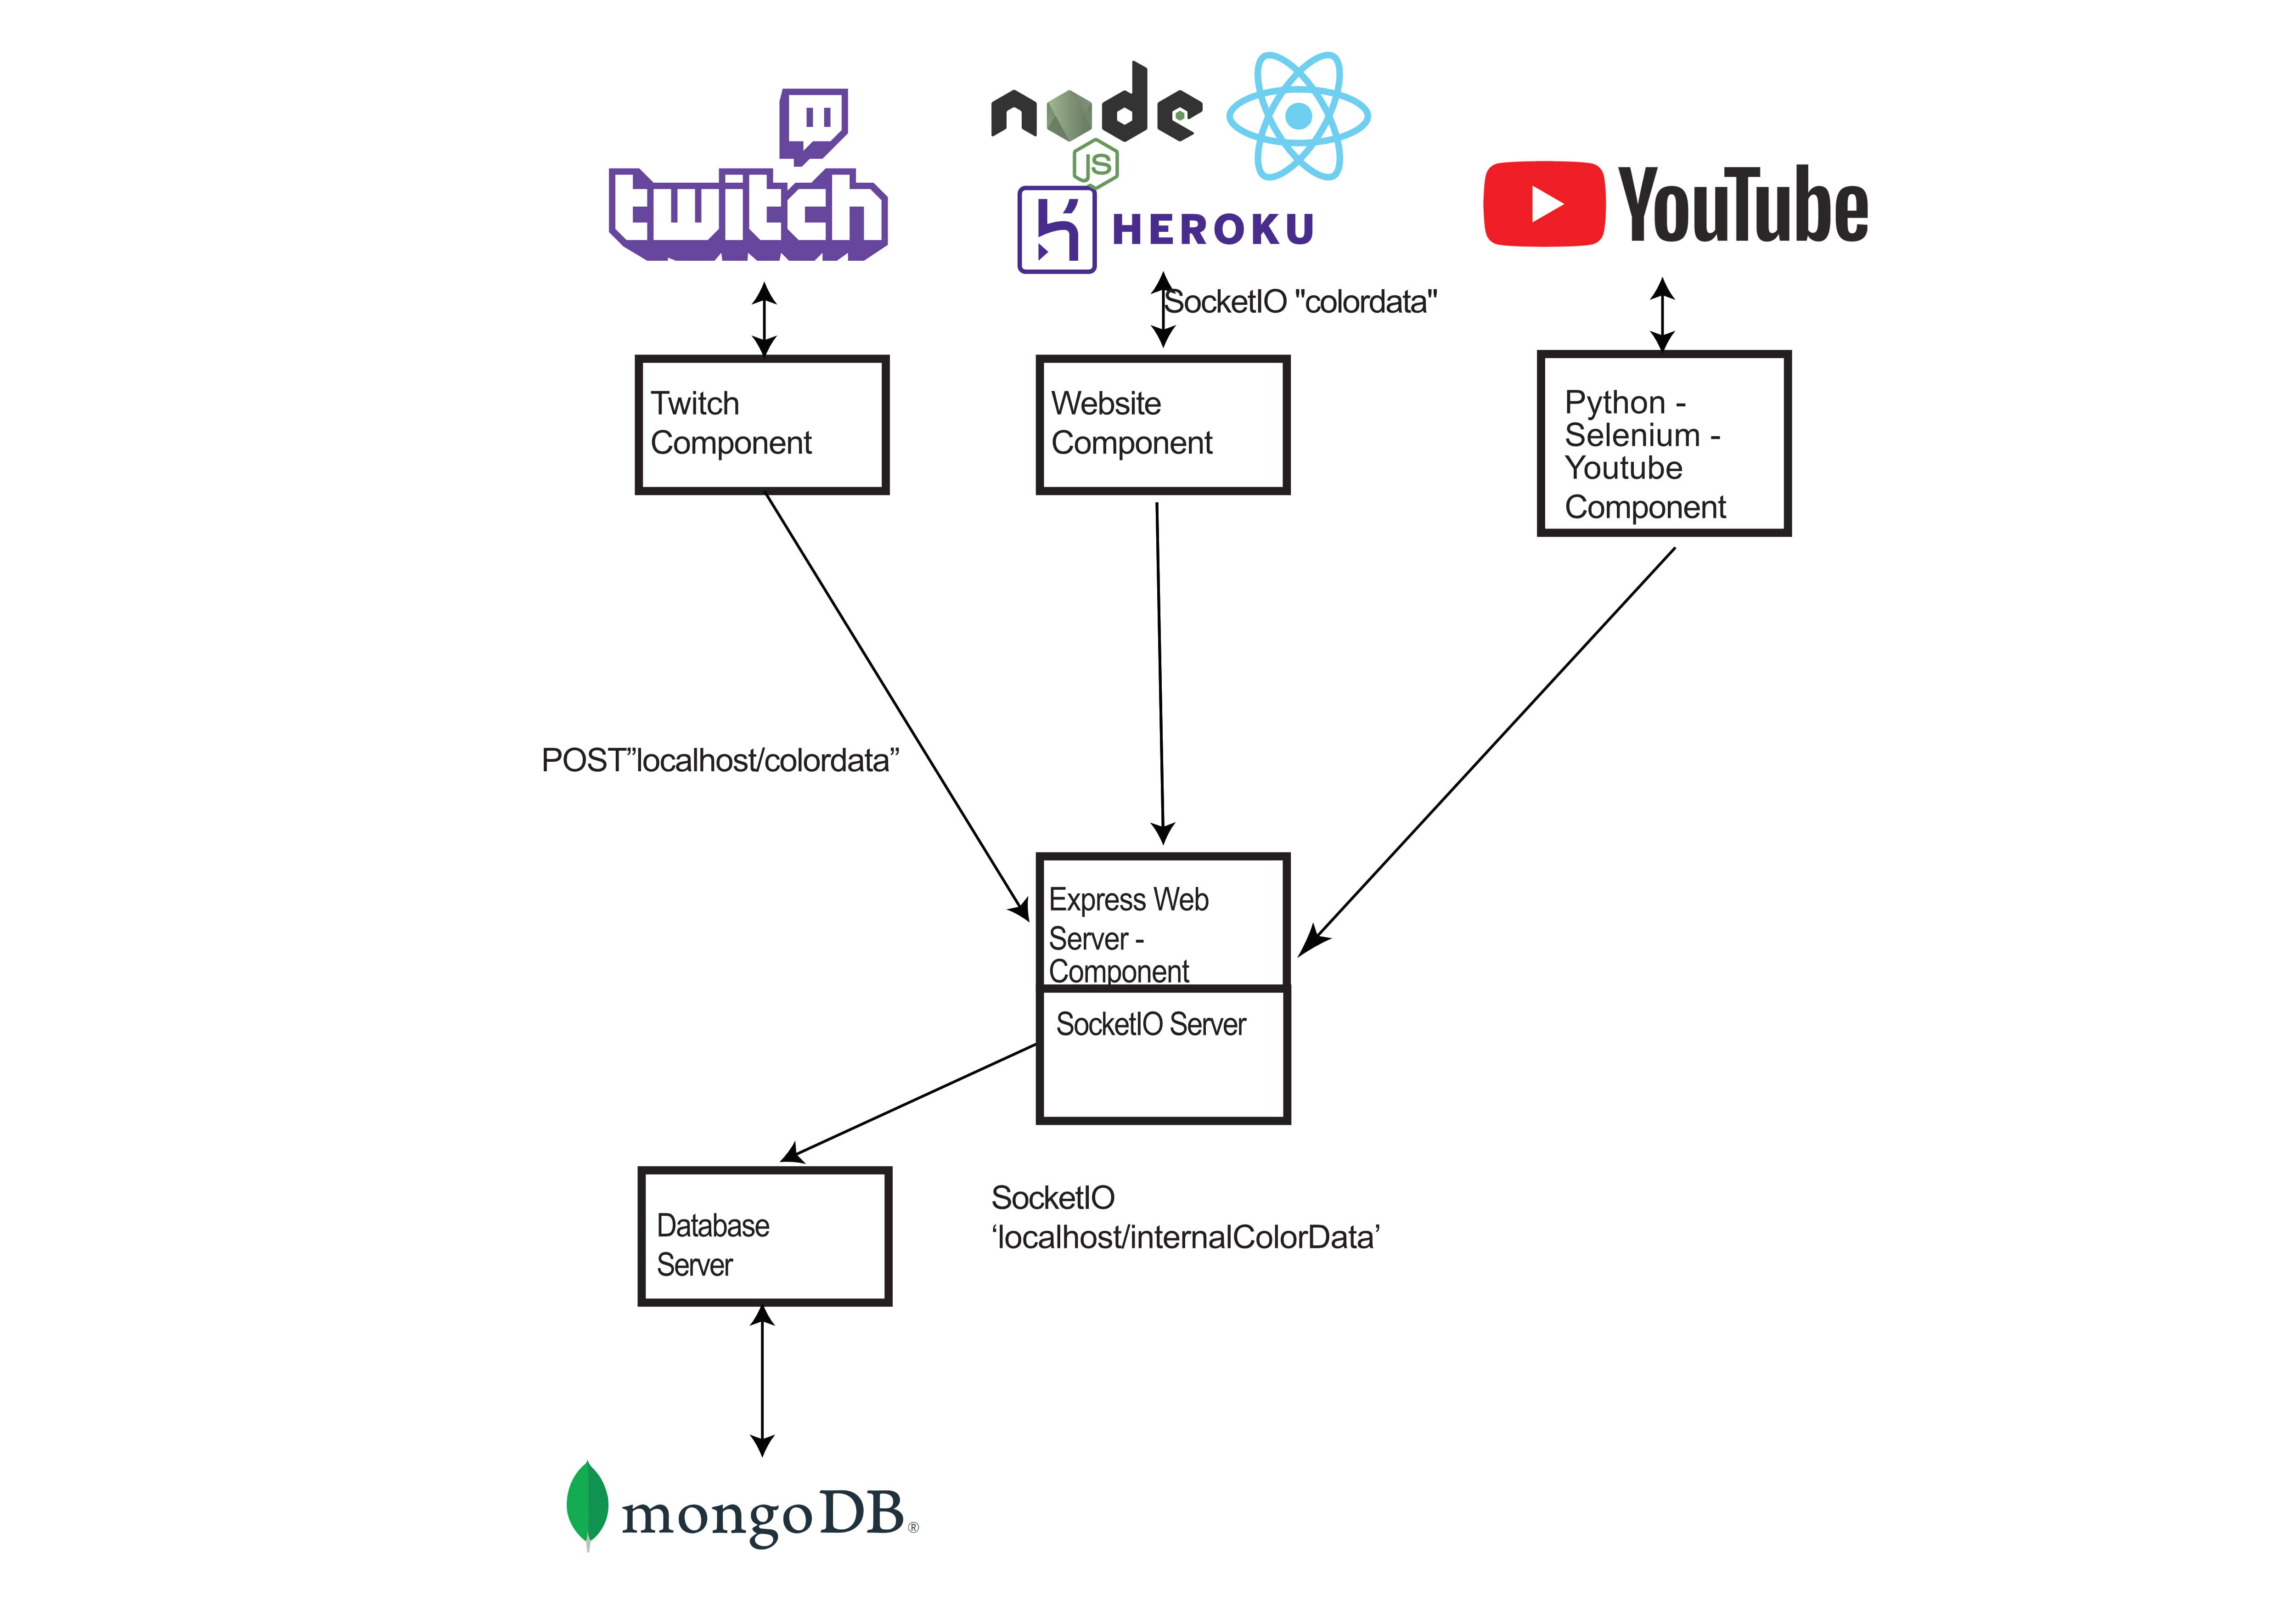
This was my first time using ReactJS and, while it’s different, I liked it. It was interesting to be able to turn every part of my site into a component. Because of ReactJS, I was able to generate color submit buttons for each of the colors my app uses, instead of having to manually create them. For the styling of the site I used Bootstrap v5. I also moved to a new color picker library that was mobile compatible, “Pickr”. Next I moved to hosting the site on Heroku and setting up a simple build script for the site, so ExpressJS would serve as a static version of the site.
The architecture now looks like this:
Getting YouTube chat data:
Another data source I wanted was YouTube chat, but found a big issue with it. You are only given 10,000 credits to use on the API for every 24 hours. With each read of the polling based API (not a modern real-time streaming API like Twitch) it costs 1 credit. After running the numbers I would burn through that API limit in ~2.5 hours. So I moved to using Selenium with Chrome webdriver to load the chat data. This posed some issues that can be read about in my blog post. The best part about this method is it loads the site once, queries the DOM elements, and streams the data to my internal router. All of the hashing of usernames that happens on the Twitch Bot happens here, as well*. Also, due to Python using “False” for boolean false which differs from JavaScripts “false”, I had to add code on the NodeJS side to deal with this. * Note this would change dramatically by the end of the program. The hashing is moved to the individual components.
Architecture Status:
NodeJS + Arduino:
After I had the YouTube/Twitch/MongoDB components working, I moved onto sending the data to my Arduino Uno via Serial. This was accomplished using the NodeJS Serial library. Initially I was sending a hex string, then validating on the Arduino, splitting it into RGB values and then setting the data. This caused a lot of issues though, first it was slow, second it caused the Arduino to run out of memory if too many messages were sent at once (I didn’t find this out until I could test with the LEDs).
Architecture Status:
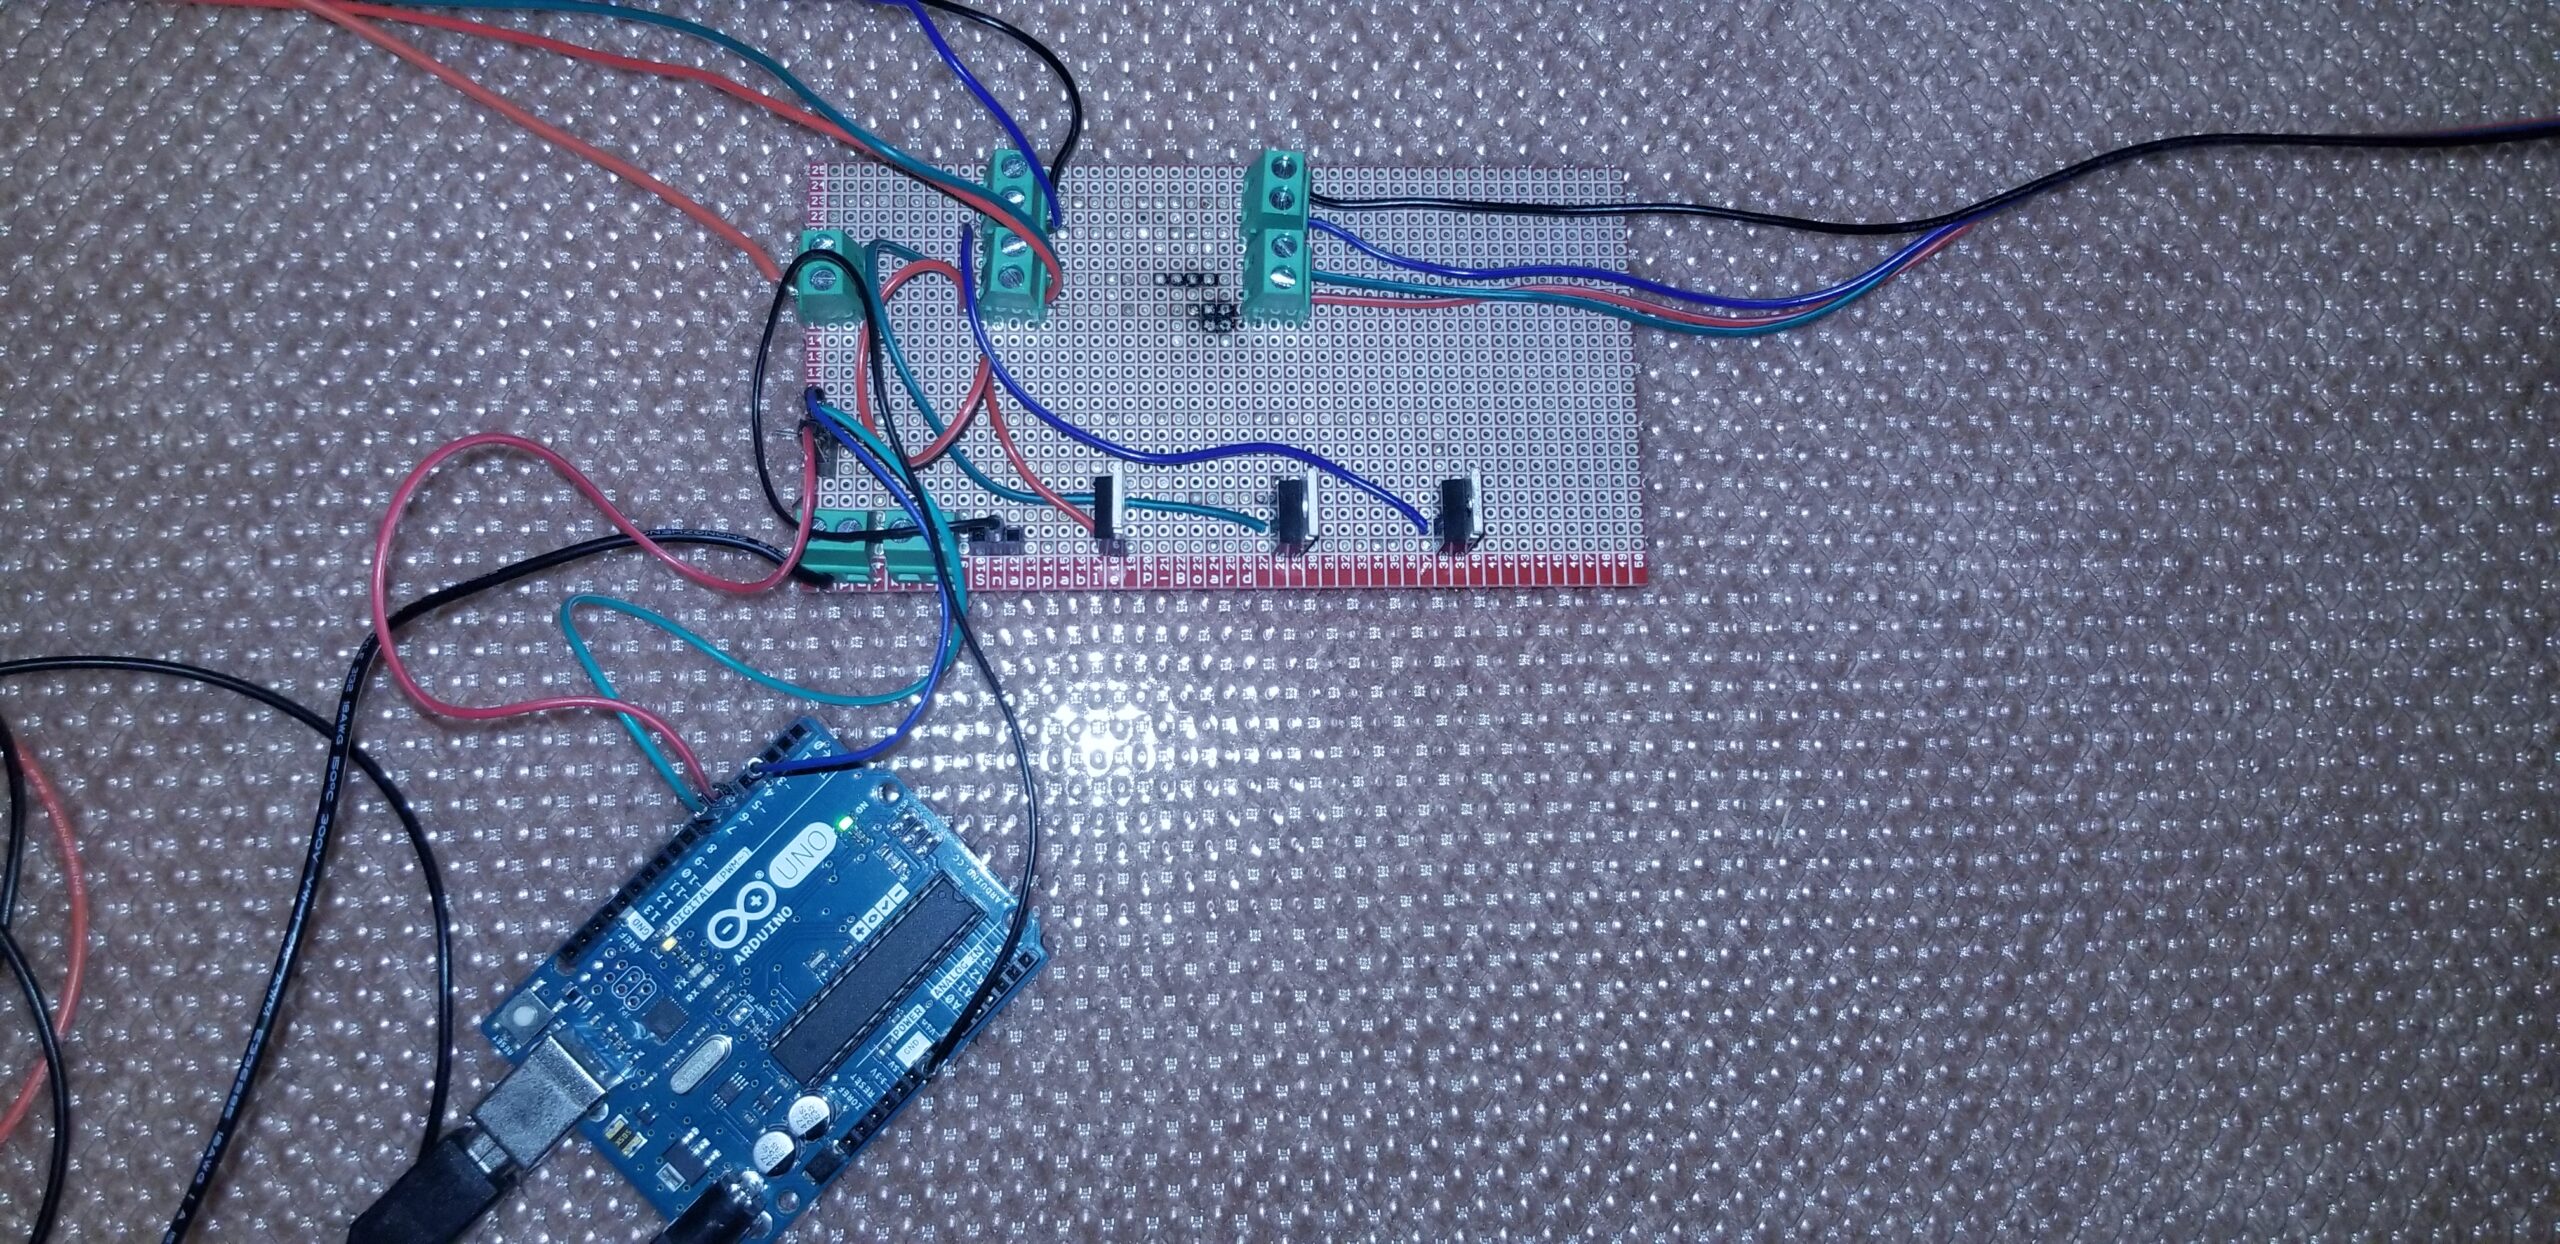
Building the circuit board:
To control analogue RGB lights, I based my circuit on this circuit guide by Adafruit. However, because I was dealing with 24v LEDs, I needed a mosfet that could handle it. I sourced the parts from 3 places: Arrow, Sparkfun, and Amazon. The power supply I used is a MEAN WELL LRS-350-24 350.4W 24V 14.6 Amp PSU. After breadboarding the circuit and confirming it works I drew out what I wanted the final circuit board design to be. From there, I built it. I used terminal blocks for the ground wires and LED connections. Because I was using perfboard, I had to create my own solder traces by connecting each hole individually with solder.
 Fast – forward video of soldering the circuit:
Rate limiting:
In order to reduce spam or potential bot manipulation, I implemented a rate limit on how quickly a user could submit a new color. This is done by a simple map (nodeJS) or dictionary structure (Python), and associating the last message time with a user. If that time is under the set timespan, the user is not allowed to set a color and their time value is not updated. If that time is greater than the allotted timespan, the user’s command is allowed and their time value is updated.
Performance:
By this point I had everything working well enough, but there were two glaring issues. The first, my Arduino crashed if it was sent too many messages in a short period of time. The second, I was experiencing data loss on my SocketIO website listener when data was being sent too quickly.
Debugging NodeJS and Arduino for increased speed:
Initially, my Arduino code received a string via serial “#AABBCC”, split the string into 3 parts and converted it from Hex to Ints. Example: FF would be 255. This way of processing data posed a big issue. The rate at which I could send messages to the Arduino (10 messages in 5ms) was faster than the 9600 baud rate could allow. When I tested spamming data from the website I caused the Arduino to crash. While not receiving an error message I believe I ran out of dynamic memory, an issue that can happen when dealing with Strings. In order to fix this, I first implemented a queuing system on the Express routing server using Bull. This implements a Redis queue, to which I pushed data when a Post request was received. When I received a new job from the queue I emitted the job data on the colormessages SocketIO channel and paused the processing for two seconds. Eventually I would bring that delay to one second then to 500ms. This queue system is something that I had hoped I wouldn’t have to implement when beginning this project, but it was very simple and increases the ability of the application to scale when there are 10,000 users trying to communicate with the app. Next, I moved onto the Arduino. First I pushed the baud rate from 9,600 to 115,200. Next I followed this guide on manipulating data using char arrays with a potential fixed length. This makes it easy to know that I won’t ever hit the max memory limit of the Arduino. I implemented the new schema for this new char array idea: R:G:B implementing a colon as a separator character. Unfortunately, I forgot I appended a /r/n line ending to my serial write abstract class. When I failed to account for that increase in length in long strings like 255:255:255, the program would read this as Red/Green/Blue = 255, BUT, then it would re-read the string as Red = 0, Green/Blue = 255. After increasing the max array length, this worked perfectly. Note: the code I used for this was very slow, and would be rewritten in Performance v2.
Moving to Redis Pub/Sub and Queue:
I decided to increase the speed of my app and make it easier to maintain by removing the ExpressJS/SocketIO routing server, and replacing it with Redis Publisher / Subscriber model, and bypassing Bull to create a Redis queue directly. So now the external listener components Website, Twitch, and Youtube push their messages to a Redis queue named “ExternalMessages”. The Redis queue has it’s first element removed and published to the “InternalMessages” channel. The Arduino and MongoDB internal listeners subscribe to that channel.
Async + Promises:
NodeJS works placing all of your tasks into this thing called the “event loop” and, if you have some code that slows down that loop, it can cause it to block javascript execution, like blocking my SocketIO listener from reading in new data. How do you fix this? By placing functions into the microtasks queue with Async and Promises. I broke down all of my CPU heavy tasks into async functions. From there I tried to reduce the number of operations they needed to complete to get what I wanted from them. Then I used Promise.all to execute a few related functions at the same time, by pushing them to the microtask queue. After doing this to Web Server and the SocketIO listener, I tested it by clicking two different buttons at the same time, and it successfully handled two messages at once. Prior to this fix, it would not be able to handle two functions, only responding to the first message. Next I took this concept to the Twitch listener.
Architecture at this point:
Building the LED tubes:
To create the LED tubes, I got 8-foot plastic tubes, normally used for premade lights, from Home Depot. I created an 8-foot strand of lights from 2 4’ lights for one tube, and ordered an 8-foot strand for the other. You may notice that once inside the tube you can’t pull the strip to expose the adhesive. I found a YouTube video that said to use a fishing hook and hook it into the adhesive. Instead of a fishing hook I found a rubber coated paper clip works well. When you are doing this make sure the paper clip is closed up and not fashioned like a hook. If it’s like a hook it will catch on your LEDs and you’ll have to make an incision in your tube to fix it. To diffuse the light, I used parchment paper.
Here is a fast-forward video of building one of the tubes:


Mounting the lights:
Initially I thought maybe I should use mounting brackets but without a 3d printer and time to create fancy wood working mounts, I decided to go with a fishing line and hang the tubes from the ceiling. To find the points where the hooks should go I used Pythagorean’s theorem. I wanted a 45* X shape so that resulted in 4 triangles with 2 45* sides and 1 90* side. The opposite and adjacent sides were 4’ long, which made the hypotenuse of 5.65’ or 5’ 5 inches set that to X. So to mount the lights I needed a Y value for spacing from the ceiling and lining up with the camera. When I knew Y, I cut a length of line to X+Y for the end of the tube closer to the ground and one to Y for the part closer to the ceiling. To hold the line to the tubes I made knots in the end of the line, stuffed them into the tube, and put the cap overtop of them to hold them in place via friction. Using the fishing line made it look like the tubes were floating on camera.
Mounting Dimensions for LED Tubes
Mounting the LED Tubes with fishing line:


Streaming setup:
So the streaming setup is like most Twitch setups. I am using a Canon t6i outputting to a Elgato Cam Link 4k USB capture card. Because no currently operating streaming service uses WebRTC, they all cause a delay to the video (they all use RTMP, Mixer was the one platform that used WebRTC with their FTL protocol). Initially when streaming I was pushing upwards of 8 seconds delay, I was able to reduce that to ~<5 seconds using this guide and reducing my streaming output to 720p from 1080p. To stream on YouTube and Twitch at the same time I’m using Restream.io. It should be noted that Twitch, unlike YouTube, will cut your stream at the 48 hour mark so their system can make a Video On Demand or VOD of the stream. OBS and Restream will successfully reconnect to Twitch at that point. After completing testing for OBS, I moved onto making the streaming a little more interesting.
Creating visual dashboard:
All the cool Twitch streamers have fun animations that happen for their streams so I wanted some for this. To create it I made a mini dashboard in OpenFrameworks(C++ Creative Coding framework).Without getting too deep into the inner workings of OF, I had to learn a lot about the openGL Matrix and what it means to push styles to the OF stack, and push matrices. I ended up using three rectangles rated 45 degrees to compliment the empty space of the X shaped lights. I also wanted to tell the audience where the current color command came from, so I created a text string that resizes based on the size of rectangles and their position, which is set via a GUI slider. Once I had everything working via the mouse-pressed event function, I moved onto getting the program data. I’m relatively new at C++ so didn’t understand how to use external libraries in the program. Therefore, using a Redis library was out, but I was easily able to setup a websocket server add-on for OpenFrameworks. After moving my code into the “onmessage” event function, I parsed the string data to JSON and set my global variables. Then on the NodeJS side, I created a websocket server Redis listener that pushed the Redis data out onto a websocket server once received. The biggest issue I had with OpenFrameworks was wrapping my head around the draw loop and how, when my socket received a message, it would interact with that loop. I solved this problem by using a few global variables and a boolean value that was flipped when a new message was detected. The string that was written to the screen in the draw loop would just change it’s text on a message, and the rectangle colors would change. Another challenge I had was creating a lookup map from the hex values, so when a new message came in I could display it as a color name or the hex value. I had to learn how to create a map in C++, and iterated over my colors JSON data flipping the key value relationship and setting that resulting data structure to be a color lookup. Also, I noticed that ofVideoGrabber function, which you use in OF to get webcam data, uses a lot of my CPU compared to OBS Studio. OBS can be getting data from multiple sources and not break 5% usage but my app will use 5% just getting data from one camera. To combat this high CPU usage I implemented an idle state: Only when the program received data would it get new pixel data from the webcam, and it would just draw whatever it had to the screen in the draw loop. This dropped my idle CPU usage to ~2%, and when I made sure it was only requesting a 720p image from the screen this lowered the CPU usage from a high of 15% to a high of 5%.
OpenFrameworks Video Dashboard
Building the cool streaming overlays in OBS:
Adding a donation overlay:
To get Tiltify, (the charity platform for this project), updates when someone donated I used a part of Streamlabs. Using their Alert Box I was able to connect the Tiltify campaign and show a message / animation when someone donated. In OBS I set the browser to point to my Streamlabs alertbox URL.
Adding analytics overlay:
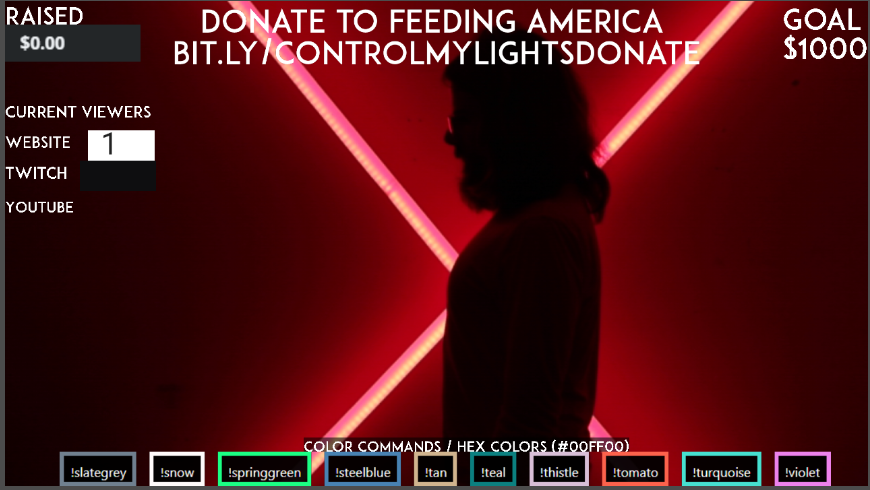
I wanted to give a sense of gamification and community across the different platforms, so I decided to display the viewership numbers across all platforms. For the website, I screen-grabbed the Google analytics real-time visitor count. Twitch and YouTube are both just screen grabs of their streams.
Text design:
I wanted the overlay text to give a futuristic, clean vibe coupled with being easy to read. This brought me to using Adam GG Pro . I purchased a commercial desktop license.
Color Command slideshow:
To get the color command slideshow I took screen shots of the color commands on the website. Then I brought the screengrab into Affinity Designer, removed the purple background and created a new image per row of the commands. Those are fed to OBS Studio Slideshow.
Affinity Designer:
OBS Studio:

Analytics:
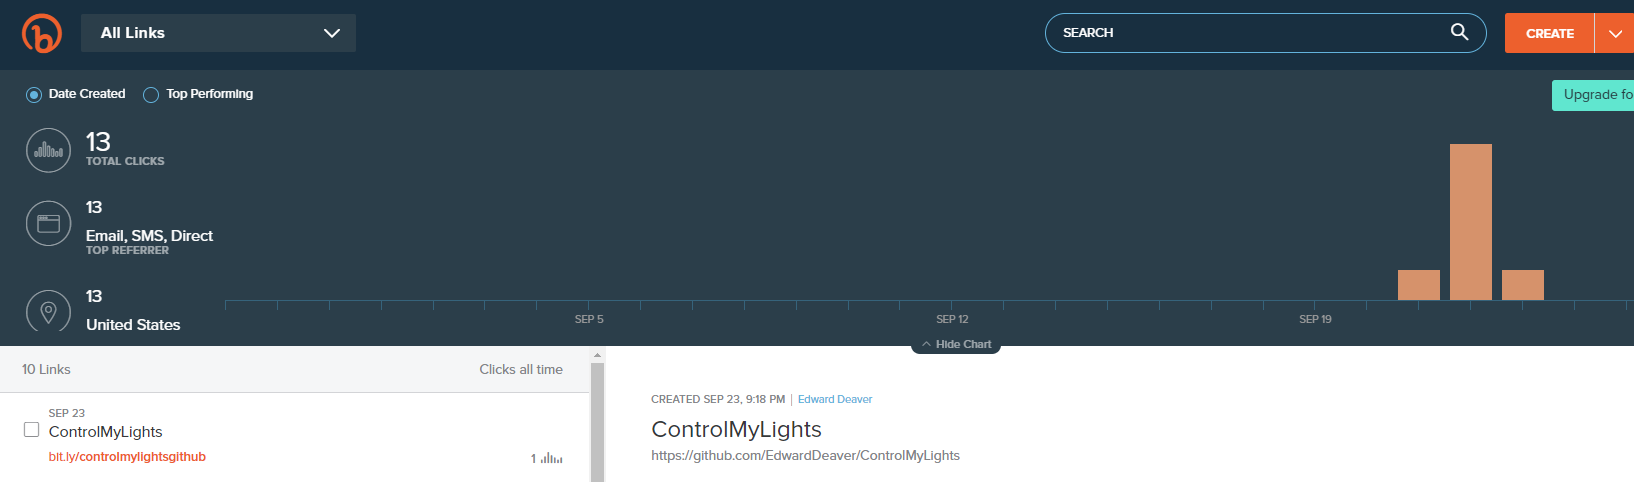
I wanted to give the viewer an easy way to find the donation link, no matter the platform. To do this, I used a bit.ly link. This also gave me the benefit of built-in analytics on that link, so I could track how many people clicked vs. donated. This experience with bit.ly would push me to make all the links on the website bit.ly links, so I could easily track outbound clicks.
Performance v2:
Redis messaging:
To reduce the number of times the NodeJS listeners would have to manipulate the messages they were receiving, and to establish a new standard of data sent around the system I moved the text manipulation code from the MongoDB listener to Redis Queue. This manipulation includes invoking the createFinalJSON command that converts messages from the YouTube Listener (Python) to JavaScript values, fixes the dates, and lowercases the color hex values. This also mitigates an issue I had in OpenFrameworks; when messages from YouTube came in, the program crashed.
Arduino v2:
Initially, the code for the Arduino would listen to serial commands inside the loop function. Also, I was checking for colons and running nested loops to get the serial data. This was incredibly slow; it also relied on blocking functions. This caused the Arduino to have a lag time from input to LED coloration of ~700ms. It would also disregard new messages while it was computing the last message. To fix this, I implemented Serial Event from here: https://create.arduino.cc/example/builtin/04.Communication%5CSerialEvent/SerialEvent/preview Using a similar technique to the link, I created a string from the characters received over serial sent in the if serial available while loop. If a newline character was sent (‘\n’), break from the loop. Once broken from, I used substring to split the numbers based on RGB, 3 index values each (Red values 0-3, Green 4-7, Blue 8-11). Because of this, though, I had to make sure each RGB value was actually 3 digits. (Example: red is 255:0:0) So, to fix this in my Arduino Listener function I converted the RGB values to strings, and if they were single digit numbers added two 0s to the front, and if they were 2 digits added one 0 to the front. Also, my Arduino code now after the first message it received produces a bug that cuts off the first character of subsequent messages. This means that a message of “250:100:100” will result in a red/green/blue value of 250/100/100 if sent as the first message. But, if that message was sent as the second or subsequent message the red/green/blue value would be “50:”/”00:”/”00”. To fix this, I added a 0 in the NodeJS script to fix it. The lag time for this new way of doing things is sub 50ms.